Everyone working in motion control has a war story; be it the machine that stopped working mysteriously or the motor that wouldn't stop vibrating. A deep dive provides some ammunition to fight the good battle and get your machine back on track!
In this deep dive we provide the first part of a multi-part deep dive series on how to fix common motion control problems. While there is always the oddball symptom that turns out to be the proverbial 'squirrel gnawing on the wires', most problems have common sources and common solutions.
My Motor Is Making A Lot of Noise, Even When Just Holding Position
A noisy/chattering servo axis is perhaps the single most common problem that engineers encounter when running their machine. This is not only annoying but can cause increased wear and tear on the motor and amplifier.
As it turns out, this problem can come from a number of areas. Here are some of the most common:
Lower Your Derivative Term
When using the ever-popular PID (proportional, integral, derivative) control, a high value for the derivative term tends to make the motor chatter and, in the extreme case, sound like a bag of ball bearings. Try lowering your derivative term in combination with your proportional gain to reduce noise.
If the noise goes away but the performance is no longer where you want it to be, consider two sets of servo parameters, an active set and a holding set. Many applications are fine with a bit of noise during motion, but need to be quiet while holding position. Using a less aggressive quieter holding set can be a good solution since the servo usually doesn't have to do much work to hold the axis in the same position.
Check Out Your Current Loop
Sometimes the position PID is setup just fine, and some or all of the noise may be coming from an overly aggressive current loop. If you are using a digital amplifier, try lowering the current loop gains, or re-running the auto-tuner with a less aggressive setting, if this level of control is available.
The current loop is where the electromagnetic rubber hits the road, and large spikes in the voltage sent to the motor can cause the motor to act like a speaker. Linear motors seem to be particularly sensitive to this, perhaps because their mechanical layout resembles a sounding board.
A quick check that can confirm a current loop diagnosis is to turn off the current loop by running the amplifier in voltage mode only. Not all amplifiers allow this option, and if they do you will probably have to retune the position loop to get comparable overall results. This is because the amplifier gain may be very different with and without current loop enabled

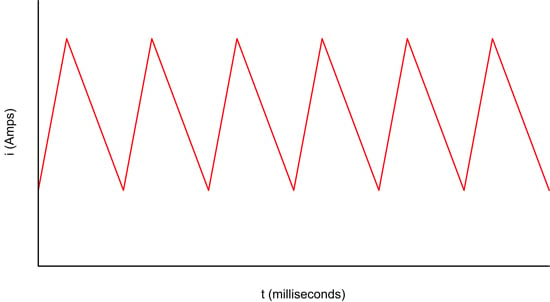
Figure 1: 'Saw Tooth' Current Ripple
If you are ready to really roll up your sleeves, grab a current probe and try another test. Lock the rotor and send a sinusoidal current command to the motor coil. Does the current probe signal look sinusoidal? Are there strange jumps at the zero crossing? Does the current waveform flatten out (saturate) at the top of the sinusoid? All of these may indicate problems with the current loop, or improper scale settings.
If all else fails and you still suspect the current loop, talk to your vendor and see if they can help! They will likely be able to provide suggestions on how to adjust the amplifier, or how to choose an alternative model that generates less noise.
You may also be interested in: Digital Current Loop Significantly Quiets Step Motor Noise
Try A Different Sampling Time
Changing the main servo loop time, or the derivative sampling time if it can be adjusted, may help with audible noise. Even if the motion is not more accurate, pitch has a big impact on perceived noise. Digital systems tend to run at very high servo loop rates, much of which is not needed in the average application.
When lowering the servo loop rate, make sure you re-tune your PID parameters. While the P (proportional) term may or may not be affected, the I (integral) and the D (derivative) values definitely will since they are time-dependent.
Fancy Filters
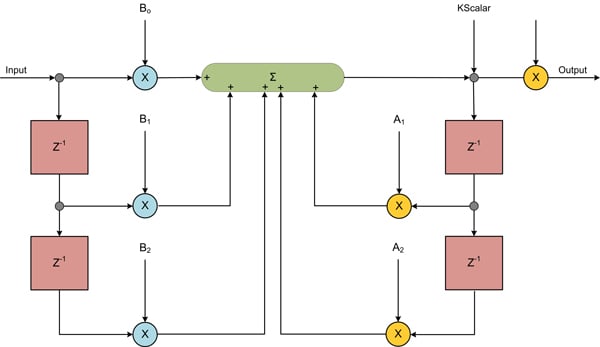
There are a few filtering techniques that you can try, although these tend to have their limitations. The most common general approach is to apply some frequency-specific filtering. This is usually done via a bi-quad filter. If your system supports these, you can try constructing a low pass or band pass filter to see if they can quiet down your axis.

Figure 2: Bi-quad Filter
Another filter modification that we have found effective at reducing noise is called Integral Deadband. Used in either the current loop or the position loop, this technique basically tells the integrator not to worry about small amounts of windup, and only kick in for larger corrections. This has the effect of lowering the frequency of small corrective commands, thereby reducing noise.
Try Sinusoidal Commutation Or FOC (Field Oriented Control)
Brushless DC motors that are commutated with traditional "6-step" control are susceptible to increased instability and therefore noise at the Hall sensor boundaries. As the motor rotates, when entering each new Hall state, the current flowing through the coils changes abruptly. This is what advances the commutation as the motor rotates.
But if your requested final position happens to fall on such a Hall boundary, the motor may become unstable as the servo controller tries to hold position. Servo loops like to have nice, proportional response curves, and the response of the motor at these boundaries is anything but. Sinusoidal commutation or other techniques such as field-oriented control (FOC) that advance the phase angle in very small increments eliminate this problem.
Check Out The Mechanics
If you have checked out the control system thoroughly, you may find that the mechanical system has too much deadband or is too compliant to operate at the performance level you want. Compliance and deadband are anathema to good motion. They cause the mechanical axes to overshoot and oscillate and inject high-frequency energy into other parts of the mechanics which can cause further oscillations.
While not every application can support the cost of a direct drive motor (and they have their own control challenges anyways), it may be that your machine just needs the next level of ball screw quality, a better coupling, more rigid framing, or some weight redistribution.
Get more in-depth information: Servo Motor Noise and Step Motor Noise
My Motor And/or Amplifier Are Getting Too Hot
When asked to do 'real' work, motors and amplifiers generate heat. That is a fact of life, and of physics. But a lot of heat comes from inefficient operation and can be avoided, or at least minimized. This section explains what to look for.
Note that many of the factors that can overheat the motor can overheat the amplifier as well. So, except where indicated, the items below tend to improve performance for both the motor and the amplifier.
But first...
Make Sure It's Actually Too Hot!
Perhaps surprisingly, the most common answer to the problem of motors or amplifiers running too hot is that they aren't. Or, more accurately, they aren't running out of specification. So measure the actual temperature of the motor and the amplifier, and compare to the unit's specification.
Many motors can run rather hot and still be in specification, so while they may feel warm to the touch, everything may be fine. Particularly with modern digital amplifiers, over temperature conditions are detected with sensors inside the amplifier. So if you aren't getting 'over temp' triggers, you may be OK.
Even if you aren't running out of specification though, running cool is... cool. Heat is more or less always undesirable, so lower is better. The next few sections give you some specific areas to focus on.
Increase The Effective Coil Inductance
For a number of reasons, modern motors are trending toward lower inductances. While good for motion performance, low inductance makes the job of the current control circuitry more difficult.
For a large class of switching amplifiers, low coil inductance means large current ripple at each on and off switch cycle of the amplifier. These swings generate heat both in the motor and the amplifier. So one effective solution, although not always practical, is to put inductors in series with the motor coils. These inductors will slow the rise and fall of the switched current, thereby reducing ripple and reducing heat generation in most cases.
A corollary solution is to change to a motor with higher inductance. If your application will allow it, this will have the same effect as reducing current ripple and therefore waste heat.
Switch At A Higher PWM (Pulse Width Modulation) Rate
A less painful way of minimizing current ripple or 'saw toothing' is to increase the switching frequency of your drive, or select a new drive with a higher switching frequency. A higher switching frequency will reduce the magnitude of the current ripple due to switching, and thus lower waste heat generation.
Try A Different Current Control Technique
This may only be possible if you are building your own drive, but switching amplifier configurations such as H-Bridges, which are commonly used to control step motor and DC Servo motor coils, can be controlled in several different ways. While a full description is beyond the scope of this article, different techniques have different heat generation characteristics.
Even if not designing the drive, talk to your amplifier vendor and ask them if the drive can be operated in a control mode that lowers heat generation in the amplifier and/or motor.
Lower The Voltage
Modern switching amplifiers are remarkably efficient, but they don't actually 'amplify' anything, at least in the classic sense of the word 'amplification'. They simply connect, or do not connect, the available supply voltage to the coil at a high frequency. The resultant large swings in voltage at the motor terminals are what can cause the heat-producing current flow, even when the motor is not accelerating or decelerating the load.
By lowering the supply voltage to the motor, you lower the magnitude of the current ripple, and therefore lower waste heat production.
Make Sure Commutation Is Correct
Another common cause of inefficiency is commutation misalignment. Misalignment of the commutated electrical angle with the motor's physical angle directly reduces the efficiency with which torque is generated.
While not usually a problem when Hall sensors are used, phase misalignment in Brushless DC motors can be a problem with sinusoidal or FOC control if the phasing was not initialized correctly, or if the encoder is losing counts from time to time.
The latter condition is common when quadrature encoders are used, but can easily be corrected using the motor's Index pulse. Most modern motion controllers, including all Performance Motion Devices' products, provide a feature for auto-correcting small quadrature encoder count losses using this Index pulse.
Some simple tests can help diagnose commutation problems. Begin by giving the motor an open loop positive torque command and then a negative torque command. In each case, record the steady state speed and compare. The speeds should be roughly equal in magnitude.
Next, run the motor with an open loop torque command at high speed for several minutes or even hours. Record the speed occasionally, noting whether it changes over time. Try this with both positive and negative torque commands. In all cases, the velocity of the motor should not change over time.
If any of these open loop motion tests show problems, take a closer look. You may have initialized phasing incorrectly, or you may not be auto-correcting encoder count losses.
Commutation misalignment can go undetected because the servo loop will happily increase the motor command to compensate for misalignment, masking actual problems until the motor becomes so inefficient at delivering torque that it, or the amplifier, overheats.
Use A Holding Torque With Step Motors
Step motors have their own peculiar heat generation issues.
When actually moving a load, step motors generally have a heat disadvantage compared to servo motors because step motors must be driven with a current that is able to overcome the axis' highest possible resistive force, whether or not that force is present at any given moment.
Servo motors are different in that they measure how much torque is needed, and apply only that amount.
For example, if a machine is designed to lift a load of 2 kg but is only loaded with a load of 1 kg, the step motor is still driven with enough current to lift the 2 kg load, whereas the servo motor will apply exactly enough energy to lift the 1 kg load.
Despite these fundamental challenges, one approach to lowering step motor heat generation is to recognize that in dynamic operation many axes of the machine will have downtime. In this case, switching the step motor to a lower 'holding command' will reduce average heat generation. You want enough holding torque to keep the load from moving, but a low enough value to lower heat output while the axis is at rest.
My Step Motor Motion Isn't As Accurate As I Thought It Would Be
Step motors have the reputation of cranking out nice, repeatable steps. But the more you ask of your step motor and controller, the more you will notice that resolution does not equal accuracy or even repeatability.
So how do I get the most out of my step motor?
Crank Up The Current
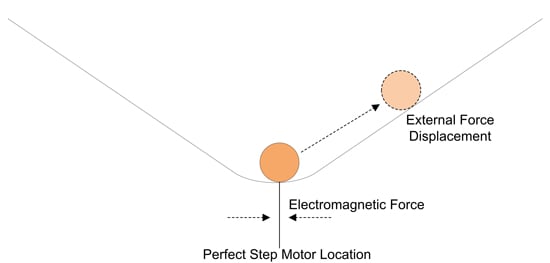
A primary culprit in step motor accuracy problems stems from the fundamental electromotive force generation inherent to a step motor. When you excite the coils at a certain phase angle, you define a roughly sinusoidal force 'valley' that your motor will settle into. Think of a ball rolling to the bottom of a trough. But if the valley has a gentle slope, as this one does, an outside force will tend to push the axis 'up the hill' to one side or the other. This means you won't quite be at the step location (the exact bottom of the valley) you expected.

Figure 3: Sinusoidal Force Valley
The simplest answer is to use a higher amount of current, because this increases the slope of the valley, thereby creating more force to resist outside forces such as friction or reflected inertia. Depending on the nature of your machine's axis, you can try a short 'snap to it' move at the end of the motion. This is a brief increase of current to snap the axis to the correct location, followed by a return to the regular amount of current. This works particularly well if the main external force is friction.
Use A 3 Or 5 Phase Motor
Another general solution to the accuracy problem is to use a motor with more phases. A standard step motor has two phases, however motors can also be purchased from various vendors that provide 3 or 5 phases. More phases means a narrower force 'valley' and therefore better accuracy.
Use An Encoder
This may or may not be a viable option from the standpoint of cost, but many applications routinely use an encoder in conjunction with a step motor to confirm and/or adjust the location of the move.
Always Approach From The Same Direction
This is an expensive trick in the sense that it will cost you move time, but both step motors and servo motors can benefit in their final positioning accuracy by always approaching from the same direction.
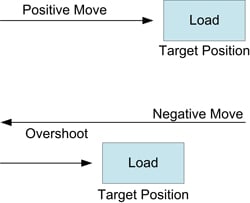
Here is how it works: in the positive direction, execute a standard landing - no change. In the negative direction, overshoot the target and then make a small positive move to load the motor and mechanics in that direction. You may choose to always approach from the negative direction by overshooting and reversing positive moves, but the effect is the same.

Figure 4: A Matter of Approach
Note that this technique only works if the axis lags the target during the move. If the deceleration rate is such that inertia causes the axis to lead the target position, this technique will not work as expected. A typical approach here is to use an S-curve profile, because they slow down much more than a trapezoidal profile when approaching the target.
Compensate Electronically
Another source of accuracy error is that even when presented with a perfectly sinusoidal micro-stepping waveform, step motors do not increment in perfectly linear steps. Over the course of a full step cycle, when measured to a high accuracy, you will find that the actual position differs from the theoretical straightline motion by anywhere from 3 to 20% depending on the motor, and whether it has features like a skewed rotor.
To correct this, you can electronically build a compensating table so that instead of a perfect sinusoid, you drive the motor with a modified waveform that linearizes the motion. Note that this technique will improve, but not eliminate, motor-specific non-linearities.
Solve other motion control problems:
Additional motor control resources:
- Got 15 minutes? Check out our Build vs Buy A Motion Controller webinar
- Feedforward in Motion Control - Vital for Improving Positioning Accuracy
- Mechanical Resonant Frequency and How to Analyze It
- Optimize A Control Architecture for High Accuracy Syringe Dispensing


